Fresh from new cookbook Weeknights with Alice, it’s the best bits of mornay made better (and greener). Plus, spinach and cheese pan pies with hot honey drizzle and cheesy brocc smash burgers.

Cooking dinner every night for different ages and appetites is one thing. Trying to load it with fresh, healthy veg can be a whole other challenge. For cookbook author and broadcaster Alice Zaslavsky, the answer lies in colour – literally. Rather than trying to focus on individual nutrients, she takes a simpler approach by using whatever is in season and making the meal as vibrant as possible.
“If you’ve ever felt overwhelmed by nutritional advice, here is an easy message to digest: make the focus loading up your diet with colour and variety,” Zaslavsky writes in her new cookbook Weeknights with Alice.
“We continue to discover more about the phyto-nutrients and bioactives contained within each unique hue. And it’s an easy remit for me to deliver on because more veg always means more colour!”
The new collection includes 80 low-stress midweek dinners, each one starting with vegetables so you can follow the seasons or use up whatever’s in your crisper. Because vegetables form the bulk of the meals, with protein playing a lesser role, the recipes are more cost-effective too. Many are also served “family-style”, where each person can pick and choose what they want to eat, which encourages younger eaters to try new foods, and lets the cook sit down faster.
So whether home cooks are managing time pressures, fussy palates or budget constraints, the recipes are designed to ease the “persistent pinch-point” of weeknight cooking.
Here, Zaslavsky shares three recipes that hero vegetables in fresh ways, from a zesty spin on tuna mornay to a midweek version of spinach and cheese pan pies, and “meaty” fritters made from your favourite chargrilled brassica.
The best recipes from Australia’s leading chefs straight to your inbox.
– Megan Johnston
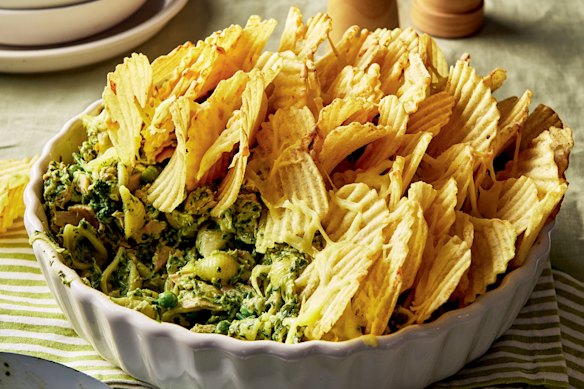
Tuna mornay with salt and vinegar chippie scales
Sing it with me: When you stir creamy sauce with some tuna, of course, that’s a mornay! If you grew up in Australia, you’ll probably be surprised to learn that tuna mornay is actually pretty exotic for anyone who didn’t, and one advantage of coming to it later in life is playing fast and loose with this canonical classic of Cucina Australiana. I’ve taken the best bits of a mornay (creamy, comforting, casserole), eliminated the margin for gluggy error by replacing the bechamel with a creme fraiche-based green sauce that’s full of zip and zest. If using tuna in spring water, drain and add ⅓ cup (80ml) olive oil to the green sauce instead. And it’s all topped off with a Friday night fish 𝄒n𝄒 chips vibe from the salt and vinegar crisps – bonus points if they’re crinkle-cut!
INGREDIENTS
- 425g tin tuna in olive oil, drained (reserving the oil)
- 2 tbsp brined capers, drained
- 250g dried pasta shells
- 1 cup (140g) frozen peas
- 1 bunch broccolini, cut into 1cm pieces
- 150g shredded cheddar
- 165g packet of crinkly salt and vinegar crisps
- olive oil
Green sauce
- 1 bunch parsley
- 3-4 garlic cloves, peeled zest and juice of 1 lemon
- ⅓ cup (80ml) tuna oil (reserved from above)
- ¼ tsp freshly ground black pepper
- 200ml creme fraiche
METHOD
- Heat is on → Preheat your oven to 170C fan-forced (190C conventional) and bring a large pot of well-salted water to the boil.
- Green with envy → To make the green sauce, roughly chop the parsley (to make it easier to blitz), then toss it in your food processor or blender. Add the garlic, lemon zest and juice, tuna oil and black pepper, then blitz together for a couple of minutes, into a green paste. Scoop in the creme fraiche and blitz again to incorporate. Transfer to your largest mixing bowl and dump the drained tuna and capers in too.
- Shell be right → Once the pasta water is at the boil, rain in the pasta, stirring about for the first minute or so to stop it clumping. Cook for 1 minute less than suggested on the packet. Before draining the pasta, pop your peas and broccolini in a colander in the sink. Drain the pasta over your greens to give them a swift blanch and take the frosty edges off the peas.
- All together now → Toss the pasta, broccolini and peas into the mixing bowl. Tumble in half the cheddar and stir to thoroughly coat everything with the green sauce. Check for seasoning.
- Bake it ’til you make it → Transfer to a ceramic baking dish or pie dish. Top with the crisps, standing them to jaunty attention (or crunch them over if you’re in a hurry). Sprinkle with the remaining cheddar. Drizzle over a lick of olive oil and bake for 10 minutes, until the cheese is golden and the sauce is bubbly. Wearing oven mitts, remove your catch from the oven and leave to stand for 5 minutes or so before serving at the table.
Double duty → You could enjoy this cold as a pasta salad the next day. The chippies will go a little soggy, so this is your permission slip to eat all the chips first!
Serves 4-6
Spinach and cheese pan pies with hot honey drizzle
These pan pies are a loose play on khachapuri imeruli, a type of Georgian cheese bread that’s a cousin to the iconic cheese and egg boats known as khachapuri adjaruli. Though traditionally an imeruli uses a yeasted dough to encase cheeses such as suluguni, I’ve adapted the dough into a speedy yoghurt flatbread and the cheeses to suit a midweek cook anywhere – you could even use a mix of pizza cheese and feta. And for a speedier shortcut, you could use shop-bought pizza dough … my favourite hack is buying some straight from my local pizza place! Spinach breaks down to almost nothing as it cooks, so unless you have lots growing in the garden, use frozen spinach for recipes requiring a large amount. If you have time, thaw the frozen spinach overnight in the fridge on kitchen towel, to absorb the liquid around the spinach as it melts and help it to better retain its colour and texture. If you’re in a hurry, run a tap over the frozen spinach clumps. Once thawed, drain and squeeze out the excess moisture before using. If serving in a heat-avoidant household, hold the hot honey and sprinkle the pies with salt flakes and a little drizzle of honey instead.
INGREDIENTS
- ¼ cup (60ml) olive oil
- 2 tbsp butter
Yoghurt dough
- 2 cups (300g) self-raising flour, plus extra for dusting
- 1 cup (260g) Greek-style or natural yoghurt
- 1 tsp salt flakes
Cheese and spinach filling
- 500g frozen spinach, thawed
- 150g block of feta (creamy or crumbly, whatever you’ve got)
- 1 cup (100g) grated cheddar
- 100g firm mozzarella, grated
- 3 spring onions, greens finely sliced (reserve the whites for the salad)
- 1 tsp freshly cracked pepper
Hot honey drizzle
- ¼ cup (90g) mild-flavoured honey
- 1 tsp mild chilli flakes
Baby spinach salad
- 125g baby spinach
- 3 white spring onion stems (reserved from the filling), sliced on an angle
METHOD
- Dough! → Combine the dough ingredients in a medium bowl and mix with a wooden spoon until it all forms a shaggy mess. Get your hands in there to form a ball of dough, then turn out onto a clean floured surface and knead for about 2-3 minutes. You’ll want some extra flour on hand for the kneading. The dough’s ready when it’s smooth and springs back when you pop a finger pad into it. Be careful not to overwork it. Place a clean tea towel over it while you make your filling.
- Filling time → Wrap the thawed spinach in a tea towel and squeeze out as much excess moisture as you can. Tip the wrung-out spinach into a mixing bowl, add the other filling ingredients and mix to combine with your wooden spoon. Taste for seasoning.
- Hot honey → Combine the hot honey drizzle ingredients in a small saucepan and place over low heat. Cook gently for a few minutes, until the honey is warmed through and runny. Switch off the heat and leave the chilli to infuse into the honey.
- Ship shape → Using a board scraper or knife, divide the dough into four even pieces. Pull out a dough quarter, then cover the rest with your tea towel again. Sprinkle flour on your rolling pin (or wine bottle!) and bench to prevent sticking. Roll out the ball of dough into a 12cm round. Pop one-quarter of the filling mixture in the middle of the dough, then fold the edges over the filling so it’s covered, flattening down to seal it all together. Try to avoid any holes here, otherwise the filling will escape. Tighten the edges to make a round shape. You can roll out all the pies here and keep them under a tea towel if prepping ahead or make the rest on the fly as you’re waiting for each to fry.
- Fry time → Heat a medium frying pan over medium-low heat. Add a drizzle of olive oil and a teaspoon of the butter and wait for it to foam and melt. Pop a pan pie into the pan and cook for 3-5 minutes on each side, with a drizzle more oil if needed; you want a deep golden colour and the edges to be creamy white (if they’re still opaque, your dough hasn’t fully cooked through yet). Cook the remaining pan pies in the same way. To keep your cooked ones warm, stack them in a tea towel in a warm spot.
- Toss up → Just before serving, toss the baby spinach and spring onion in a large mixing bowl with a sprinkle of salt flakes, black pepper and a drizzle of olive oil.
- Bring it home → Serve the warm hand pies drizzled with the hot honey, with the salad on the side
Double duty → Leftover pies are great for lunch the following day, either cold or reheated, and will last for up to 5 days in the fridge
Makes 4
Cheesy brocc smash burgers with ruby slaw and dilly dipper
I’ve always felt the best part of a double cheeseburger isn’t the burger but the cheese! Brassicas such as broccoli, when burnished, offer plenty of chargrilled flavour in these surprisingly “meaty” fritters. You’ll be happy to know a food processor or box grater does most of the work, and happier still to see how kids love scoffing these for dinner.
INGREDIENTS
- 3-4 spring onions, whites roughly chopped (reserve the greens for the dilly dipper)
- ½ bunch parsley, roughly chopped
- 2-3 garlic cloves, peeled zest of 1 lemon (reserve the nude lemon for serving)
- 2 tbsp olive oil, plus extra for brushing
- 1 large head of broccoli (about 500g); you could also use broccolini or cauliflower
- 2 medium zucchini (about 400g)
- ½ cup (50g) grated hard cheese, such as parmesan
- 1 cup (120g) chickpea flour
- 1 tsp baking powder
- 1 tsp chicken-style stock powder (or 1 crumbled cube)
- 8 slices tasty cheese
Ruby slaw
- ¼ red cabbage, finely shredded
- 425g tin baby beetroot, drained, then coarsely grated
- ¼ red onion or red shallot, finely sliced
Dilly dipper
- 3-4 spring onion greens (reserved from above)
- 1-2 dill sprigs
- ¾ cup (185g) sour cream
Home stretch
- pretty dill fronds (reserved from above)
- nude lemon (reserved from above), cut into cheeks
METHOD
- Squish your veg → In a food processor or blender, blitz the spring onion whites, parsley, garlic, lemon zest and olive oil to a fine paste, then transfer to a mixing bowl. Switch to the coarse grating attachment (or a box grater) to coarsely grate the broccoli, zucchini and hard cheese. Dump the grated veg and cheese over the herby paste in the mixing bowl. Stir a teaspoon of salt flakes through, give everything a good squish, then leave for 5–10 minutes to get really juicy.
- Oven goes on → While the veg mix steeps, preheat your oven to 200C fan-forced (220C conventional).
- Fritter away → Sift the chickpea flour, baking powder and stock powder over the squishy veg. Crack in some black pepper and stir together with a spatula until well incorporated, ensuring there are no dry spots. If your batter feels a bit too loosey-goosey, mix in another tablespoon of chickpea flour. Line a large baking tray with baking paper and brush with oil. Scoop eight ¼ cup mounds of mixture onto the tray, leaving 2 cm (3/4 in) of room around each burger, to allow air to circulate for crispy edges. Flatten slightly into “smash burger” patties.
- Bake it ’til you make it → Bake the burgers for 12–15 minutes. Using a spatula and another utensil as a cantilever, gently flip the fritters, then bake for another 12-15 minutes, until golden and firm.
- Cheesy finish → Switch the oven off and top each fritter with a cheese hat, leaving them in the still-warm oven to get melty.
- Meanwhile, back at the ranch → Toss the ruby slaw ingredients together in a bowl, then set aside.
- Do the dilly dipper → Finely slice the spring onion greens and toss in a small bowl. Reserve the prettiest fronds from the dill sprigs, then finely chop the rest. Add to the bowl with the sour cream and a pinch of salt and pepper and stir together. Taste and adjust if needed.
- Bring it home → Arrange the cheesy smash burgers on a board or platter. Sprinkle salt flakes and a crack of black pepper over the top, finishing with a smattering of pretty dill fronds. Serve with the ruby slaw, dilly dipper and lemon cheeks.
Double duty → These make great burgers in a bun too! Just sandwich the warm smash burgers in the buns with the slaw and dipper inside.
Serves 4
This is an edited extract from Weeknights with Alice by Alice Zaslavsky, photography by Rochelle Eagle. Murdoch Books RRP $45.00.
 Alice Zaslavsky is a best-selling cookbook author, host of ‘A Bite to Eat with Alice’ on ABC TV and can be found on the socials as @aliceinframes
From our partners
Disclaimer : This story is auto aggregated by a computer programme and has not been created or edited by DOWNTHENEWS. Publisher: www.smh.com.au